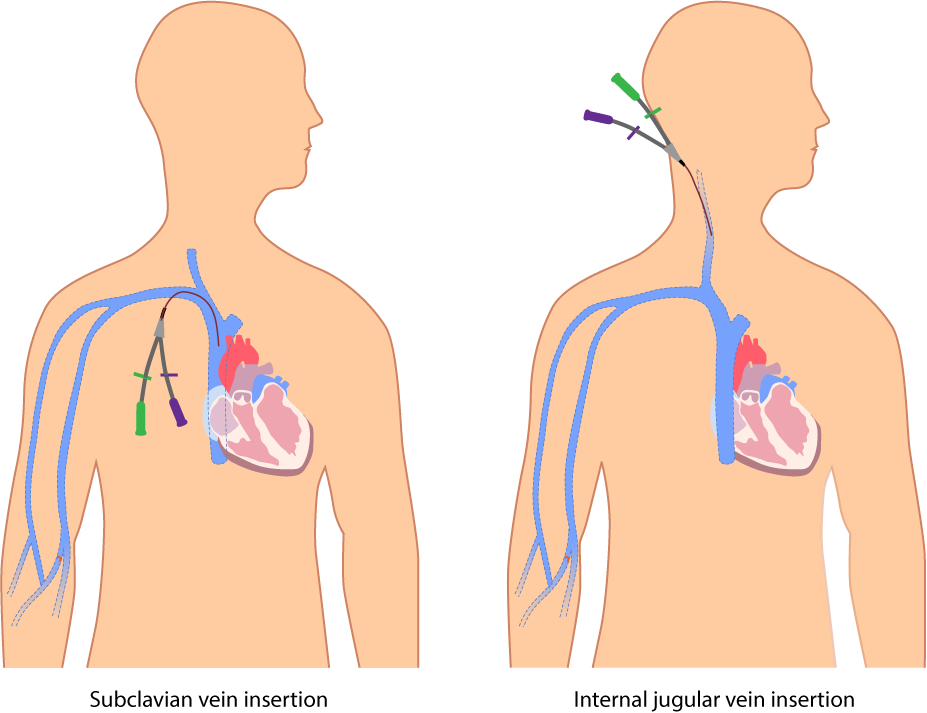
Delve into the detailed illustration of percutaneous Central Venous Catheter (CVC) insertion techniques, highlighting the subclavian and internal jugular vein approaches. This medical image serves as an essential educational tool for medical students and professionals, offering insights into the anatomy and procedural steps involved in CVC placement. Gain a comprehensive understanding of these critical vascular access methods used in clinical practice.

Label Introductions
-
- Subclavian vein insertion
This technique involves inserting the Central Venous Catheter (CVC) into the subclavian vein, located beneath the clavicle, providing a direct route to the superior vena cava. The approach is favored for its stability and lower infection risk, though it carries a risk of pneumothorax if not performed with precision.
- Subclavian vein insertion
-
- Internal jugular vein insertion
This method entails placing the CVC into the internal jugular vein, accessible from the neck, offering an alternative route to central circulation. It is often preferred in emergency settings due to easier ultrasound visualization, but it may increase the risk of arterial puncture.
- Internal jugular vein insertion
Exploring Percutaneous Central Venous Catheter (CVC) Insertion Techniques
This illustration provides a clear depiction of percutaneous Central Venous Catheter (CVC) insertion via the subclavian vein insertion and internal jugular vein insertion methods. Designed for medical students and professionals, this guide explores the anatomical considerations, procedural techniques, and clinical applications of these approaches. Let’s break down the details to enhance your understanding of this vital medical procedure.
Overview of Percutaneous Central Venous Catheterization
Percutaneous Central Venous Catheter (CVC) insertion begins with recognizing its role in providing reliable central venous access. This procedure involves threading a catheter through a peripheral vein into a central vein, such as the subclavian or internal jugular vein, to administer medications, fluids, or monitor central venous pressure. The choice between subclavian vein insertion and internal jugular vein insertion depends on patient anatomy and clinical needs.
-
- Commonly used in critical care, dialysis, and long-term intravenous therapy.
-
- Requires sterile technique to minimize infection and complication risks.
Anatomical Considerations for Insertion Sites
The anatomy of the insertion sites is critical for successful CVC placement. The subclavian vein insertion utilizes the subclavian vein’s location beneath the clavicle, offering a straight path to the superior vena cava with minimal patient movement interference. The internal jugular vein insertion targets the internal jugular vein in the neck, which is easily accessible and aligns with the carotid artery, requiring careful differentiation during ultrasound-guided procedures.
-
- The subclavian vein is surrounded by the lung apex, posing a pneumothorax risk.
-
- The internal jugular vein’s proximity to the carotid artery necessitates precise imaging.
Procedural Techniques and Steps
The insertion process starts with patient positioning and sterile preparation. For subclavian vein insertion, the patient’s arm is positioned downward, and the needle is inserted below the clavicle, guided by anatomical landmarks or ultrasound. For internal jugular vein insertion, the head is turned slightly, and the needle enters at the apex of the sternocleidomastoid muscle, often with real-time ultrasound to ensure accuracy.
-
- The Seldinger technique is used, involving needle puncture, guidewire placement, and catheter threading.
-
- Local anesthesia reduces patient discomfort during both insertion methods.
Clinical Indications and Applications
Percutaneous CVC insertion is indicated for patients requiring central access for various treatments. The subclavian vein insertion is ideal for stable patients needing long-term access, such as those on bold chemotherapy or parenteral nutrition. The internal jugular vein insertion is preferred in emergencies or when subclavian access is contraindicated, such as in patients with coagulopathy.
-
- Used for hemodynamic monitoring, drug administration, and fluid resuscitation.
-
- Essential in intensive care units (ICUs) and operating rooms.
Potential Complications and Mitigation
Complications are a key concern with CVC insertion. Subclavian vein insertion may lead to pneumothorax or hemothorax due to its proximity to the lung, requiring chest X-ray confirmation post-procedure. Internal jugular vein insertion carries a risk of carotid artery injury or hematoma, mitigated by ultrasound guidance and experienced operators.
-
- Infection at the insertion site is a common risk, necessitating strict aseptic technique.
-
- Catheter malposition can cause arrhythmias, requiring immediate correction.
Advantages and Disadvantages of Each Approach
Each insertion method offers distinct advantages. Subclavian vein insertion provides greater patient comfort and lower infection rates due to its location away from the head, but it is technically challenging. Internal jugular vein insertion allows easier access and visualization, though it may be less comfortable and more prone to thrombosis with prolonged use.
-
- Subclavian access is less affected by neck movement or dressings.
-
- Jugular access is more accessible in patients with distorted chest anatomy.
Ultrasound Guidance in CVC Placement
Ultrasound guidance has revolutionized CVC insertion. For internal jugular vein insertion, it enhances visualization of the vein and adjacent structures, reducing complication rates. While less commonly used for subclavian vein insertion, ultrasound can still improve safety by identifying anatomical variations.
-
- Real-time imaging confirms vein patency and guidewire position.
-
- Training in ultrasound techniques is essential for medical students.
Maintenance and Long-Term Care
Post-insertion care is crucial for CVC longevity. Both subclavian vein insertion and internal jugular vein insertion sites require daily inspection for signs of infection or displacement. The catheter should be flushed with heparin or saline to prevent occlusion, following hospital protocols.
-
- Dressing changes occur every 7 days or if soiled, maintaining sterility.
-
- Patient education on recognizing complications is vital.
Training and Education for Medical Professionals
This illustration is a valuable resource for medical students learning CVC insertion. Understanding the differences between subclavian vein insertion and internal jugular vein insertion prepares students for clinical practice. Simulation training with anatomical models reinforces procedural skills.
-
- Workshops focus on complication prevention and ultrasound use.
-
- Case studies enhance decision-making for site selection.
The percutaneous Central Venous Catheter (CVC) insertion techniques, as illustrated with subclavian vein insertion and internal jugular vein insertion, are fundamental skills for medical students and professionals. This image provides a clear anatomical guide, enhancing procedural knowledge and patient safety. Mastering these techniques ensures effective vascular access and optimal patient outcomes in various clinical scenarios.
-
- Percutaneous Central Venous Catheter (CVC) Insertion: A Detailed Guide
-
- Understanding Subclavian and Internal Jugular Vein CVC Insertion
-
- Percutaneous CVC Techniques: Subclavian vs. Internal Jugular Approaches
-
- Guide to Central Venous Catheter Insertion for Medical Professionals
-
- Mastering Percutaneous CVC Placement: Anatomical Insights

