Accurate lead placement is the cornerstone of diagnostic fidelity in clinical cardiology, specifically when performing a 12-lead electrocardiogram. The image provided illustrates the precise anatomical landmarks required for positioning the precordial (chest) leads, known as V1 through V6. Correctly identifying the specific intercostal spaces and reference lines on the thoracic cage ensures that the electrical activity of the heart is recorded from the standard horizontal plane, minimizing the risk of misdiagnosis due to electrode displacement.
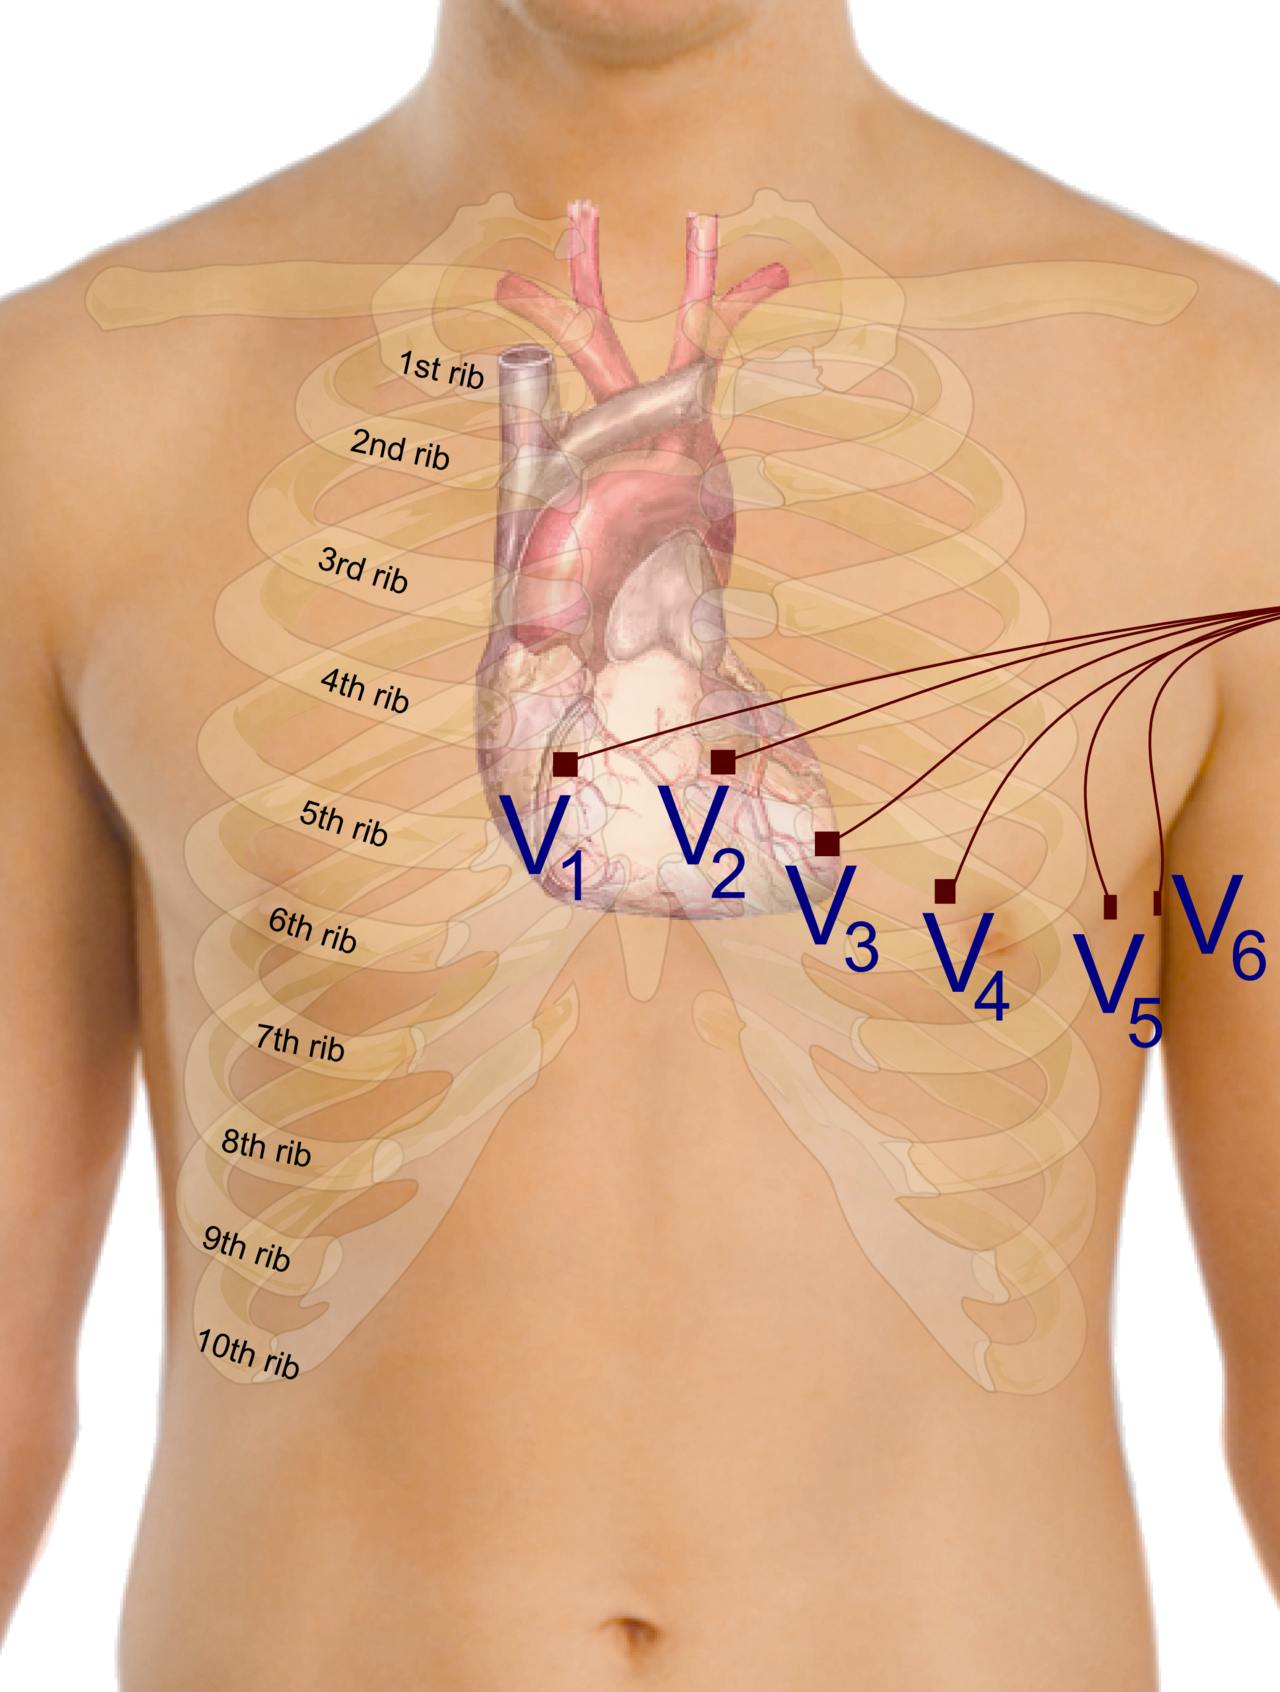
V1: This electrode is placed in the fourth intercostal space at the right sternal border. It primarily views the right ventricle and the ventricular septum, serving as a crucial lead for identifying right bundle branch blocks and posterior wall myocardial infarctions.
V2: Located in the fourth intercostal space at the left sternal border, directly across the sternum from V1. This lead provides a focused view of the proximal anterior wall of the left ventricle and works in conjunction with V1 to assess septal activity.
V3: This lead is positioned midway between V2 and V4 on the chest wall. It is essential for monitoring the anterior wall of the left ventricle and represents the transitional zone between the septal and lateral leads.
V4: Placed in the fifth intercostal space at the midclavicular line (an imaginary vertical line dropping from the center of the clavicle). This lead looks directly at the apex of the heart and is vital for diagnosing apical hypertrophy or ischemia.
V5: Located at the same horizontal level as V4, but positioned at the left anterior axillary line. This lead begins the assessment of the lateral wall of the left ventricle, capturing electrical forces moving toward the left side of the torso.
V6: Positioned at the same horizontal level as V4 and V5, placed at the left midaxillary line (directly under the armpit). Along with leads I and aVL, V6 provides a comprehensive view of the high and low lateral wall of the left ventricle.
Ribs (1st–10th): The image labels the rib cage from the 1st to the 10th rib, which serves as the skeletal grid for locating the intercostal spaces (the gaps between the ribs). Clinicians palpate these bony landmarks, starting from the sternal angle (Angle of Louis) adjacent to the 2nd rib, to count down to the 4th and 5th intercostal spaces for accurate lead placement.
The Physiology and Anatomy of Precordial Lead Placement
The standard electrocardiogram (ECG) is a non-invasive diagnostic tool that records the electrical activity of the heart over time. While the limb leads view the heart in the vertical (frontal) plane, the six precordial leads (V1–V6) provide a horizontal (transverse) cross-section of the heart’s electrical vectors. Because the heart is a three-dimensional organ, these unipolar chest leads are strategically placed to surround the anterior and lateral aspects of the ventricular walls. This arrangement allows clinicians to pinpoint exactly which area of the heart muscle (myocardium) is affected by pathology.
To achieve standard placement, the clinician relies heavily on palpable surface anatomy. The most critical step is locating the “Angle of Louis,” a distinct ridge on the sternum where the manubrium meets the body. This ridge is adjacent to the 2nd rib; sliding a finger down into the gap immediately below the 2nd rib locates the 2nd intercostal space. From there, the clinician counts down to the 4th intercostal space to place V1 and V2. Errors in this vertical positioning can significantly alter the morphology of the ECG waveforms, particularly the R-wave progression, potentially mimicking signs of ventricular hypertrophy or anterior infarction.
Once the physical electrodes are in place, the ECG machine interprets the depolarization and repolarization waves moving through the heart. The precordial leads are particularly sensitive to changes in the ventricles, which are the heart’s primary pumping chambers. Specifically, these leads are instrumental in detecting various cardiac abnormalities including:
- Myocardial Ischemia and Infarction: ST-segment elevation or depression in specific leads helps localize a heart attack (e.g., V1-V2 for septal, V3-V4 for anterior).
- Ventricular Hypertrophy: High voltage amplitude in V5 and V6 often indicates thickening of the left ventricular wall.
- Bundle Branch Blocks: Widened QRS complexes in V1 or V6 can differentiate between right and left conduction delays.
- Electrolyte Imbalances: Changes in T-wave morphology across the precordium can suggest hyperkalemia or hypokalemia.
Standardization is key in electrocardiography. If leads are placed too high, too low, or laterally displaced, the resulting voltage changes can lead to false positives or missed diagnoses. Therefore, understanding the relationship between the rib cage anatomy and the underlying position of the heart is a fundamental skill for nurses, technicians, and physicians. By adhering to the anatomical landmarks shown in the visual guide—specifically the relationship between the ribs and the electrode sites—medical professionals ensure the reproducibility and accuracy of the cardiac trace.

